
(Click image for video link!!)
How to Make the Perfect Salve
Ever wonder what it takes to make a Salve?
First of all, what is a Salve? A Salve is a blend of infused oils or essential oils mixed with beeswax and are applied topically for various reasons. (Seriously, you can make a salve for just about anything, there are numerous recipes out there!) To name a few examples:
- A drawing salve - helps to draw out small foreign objects
- A diaper salve - helps to reduce irritation on a baby's buttox
- General First Aide - Aides in repairing small burns, cuts, and scrapes
- A vascular salve - helps to strengthen the vascular system
- A sore muscle salve - helps to relieve tension and nerve pain
- A lymphatic salve - supports normal function of the lymphatic system in moving occasional excess fluids
- And so on
- And so on
- (literally, this can go on forever)
Salves are super easy to make (says the person who works in a lab for a living, manufacturing herbal products). Having made a few salves in my time, I decided to document and share with the public my tips and tricks for making the perfect salve!
Mise en Place

(mee-zhan-plos) is a French culinary term, "Everything in its place!" is a literal translation. This has to be one of the most important pieces that I can emphasize when you start making your own salves. It is key to gather all of your materials and set up everything (to put everything in its place) before you begin the salve-making process, because once you start, you do not stop nor do you have time to look back. Here is a list of suggested items you will need:
- Double boiler of some sort (this can be just a smaller pot in a larger pot if you do not have a double boiler)
- Induction or flameless conduction heat source
- A rubber spatula
- Glass graduated cylinders that measure 100 mL (or a liquid measuring cup that measures in milliliters) I recommend one cylinder per infused oil, this way you do not mix your infused oils if you have to pour back into the mason jar
- Disposable loves (this makes cleanup easier)
- A dry towel/rag that can be stained
- Notebook/Paper and pen/Salve recipe (for taking notes and recording data)
- Your infused oils and essential oils (if being used)
- Beeswax or other preferred oil that is solid at room temperature
- Plastic cutting board and chef knife (if needing to chop up your beeswax into smaller, workable pieces)
- Salve tins or other vessel for receiving your hot oil/beeswax mixture
- A sample cup (to compare this batch to other batches)
- A spoon in the freezer (this part is essential if this is the first time you are making a salve, it helps you to play with the consistency before pouring your entire batch of salve)
- A pipette or other sucking tube (for when mistakes are made)
- A heat gun/hairdryer (for when mistakes are made)
- Paper towels (for resting your spatula or cleaning up spilt oils)
Double Boiler

The use of a double boiler is helpful when making your salves. Having a second pot that is heated by water is much more gentle and forgiving than heating your salve pot directly on the stovetop. Using a double boiler is implementing the "low and slow" method - bring the water in the bottom pot to a low boil/simmer, measure/cut your beeswax and add to the top pot. While your wax melts, set up your other items:
- Place your spatula in the top pot for stirring your salve (always stir in circles, back and forth stirring becomes choppy and splashes hot oils everywhere)
- Setup your mason jars of infused oils
- Place graduated cylinders/measuring equipment next to oils
- Pull out your pen and paper for notes/the recipe
- Grab your rag/dry towel
- **One of the most important steps** Set up your salve tins and unscrew all of the lids
- Apply disposable gloves
Salve Notebook

In production, we have to record every batch that we produce. We keep track of every batch of infused oil we use, the amount of time (labor) that goes into the salve, who made the salve, and the yield that our recipe produces. For making salves at home, I also recommend pen and paper, but for different reasons...It is helpful for taking notes on prototype salve batches, yield (in case something goes wrong or the consistency isn't correct), trial/error, and recording any other ideas that pop up during the salve making process.
Glass vs. Plastic/Wood
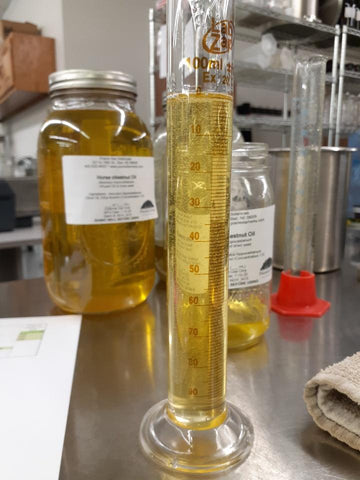
I recommend glass graduated cylinders over plastic and I recommend plastic/rubber spatulas over wood. When working with oils, materials such as fabric, cloth, paper, or wood will absorb the liquid contents we are using. Materials such as rubber, plastic, glass, and metal will clean up really well and absorb a lesser amount of oils. I highly recommend glass cylinders over plastic cylinders/measuring utensils - over time, the plastic will scratch and wear, allowing the exposed surface to absorb the infused you are working with. If you don't have a graduated cylinder, they can be purchased through many online sources at fairly inexpensive rates and possibly from your local culinary store. When measuring, always be sure to measure at the bottom of the meniscus. The meniscus is the curvy...inverted bubble at the top of your liquid in the graduated cylinder, you need the bottom of this curve to be at the desired milliliter measure.
Pouring/Measuring your Oils
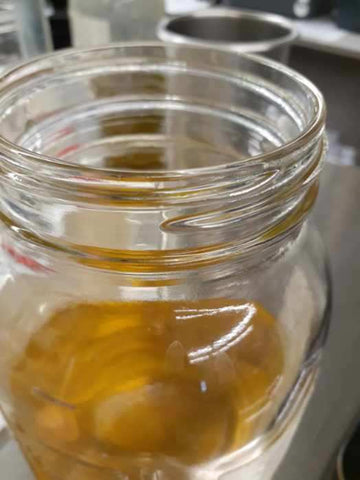

Pouring from a mason jar can be quite tricky, especially because the infused oil is thick and likes to grab onto the flat surfaces of the jar. I have found a trick to make this process fairly clean and easy. If you look at the screw top threads of the mason jar opening, you will find there is a lip that comes nearly to the brim of the opening. If you pour right where the top thread meets the opening, this will minimize the amount of exposed flat glass for the oil to grab, allowing for a clean and easy pour!
If you are making a large batch of salves, let's say...30 tins at a 2 oz. size, you will be measuring A LOT of infused oil, a couple hundred milliliters per oil. For this, here is where your notebook comes in, you can mark tallies on your recipe (1 tick marks 100 mL) to indicate how many times you have filled your cylinder at the 100 mL mark. Another option is to use the inside of your top pot to mark how many 100's of oil you have measured. Once your cylinder is empty, rest the lip of the tube on the brim of your pot, allowing the last few drops to run down the side of the pot. Create one line for each 100 mL poured!
Set Up for Pouring your Salves

After you have added all of your infused oils to your melted beeswax, given it a stir, and are waiting for the infused oils to fully incorporate (all solids to become liquid), now you need to finalize any last-minute preparations for pouring your salves. Have your salve tins set up and ready, bring the tins to the edge of the table and be sure to have all lids unscrewed and off. With the tin being at the edge of the counter/table, it allows your pouring container to be at different/workable angles so you may keep your container low and close to the tin (if you pour from a higher vantage point, you risk splashing everywhere or entirely missing your salve tin).
Always set out extra tins, your salve recipe will often produce more salves than anticipated. I also recommend having a sample cup to compare this batch with previous and future batches. If you have friends or family that love your herbal products, I recommend having smaller tins (like a 0.5 oz. tin) for giveaway samples. These giveaway salves are nice for introducing someone new to herbal practices or for testing to see if this combination of herbs is helpful for this particular situation.
Consistency Test

This is when you implement your frozen spoon!! If you have made salves before and are a pro, you already have the perfect recipe saved for the desired consistency. If you are new to this or want to make a softer or firmer salve...it's time to break out your spoon! While the salve is hot and spoon is cold, dip your spoon into your salve mixture. Allow the salve to completely dry/cool and rub your finger/scrape your nail across the salve. Smoosh it around, between your index finger and thumb, to test the consistency. If the salve is too firm, add more infused oils. If the salve is too soft, add more beeswax. IT IS OKAY TO MAKE MISTAKES, this is how we learn and perfect our processes.
Pouring your Salves


If you created a double boiler by using a smaller pot in a larger pot, you want to use a dry towel/rag for pouring. I recommend using a "dry towel/rag" because there will most likely be salve on your towel by the end of this process and salves DO NOT come out of fabric very easily. Your smaller pot will be hot from melting your beeswax, the DRY factor of your towel will prevent most of the heat from being transferred through your towel. If your towel is wet, the heat will instantly move through the towel, right into your fingers (trust me, I know).
Be sure to work quickly, but calmly. The longer the salve is in the pouring container, the faster it cools into a solid. Pouring salves is like cooking pancakes (if you have never cooked pancakes before, you have never had a perfect Saturday morning breakfast), the first salves poured almost never turn out correctly. There is a magical moment when pouring into a salve tin, the liquid level will rise and rise until it grabs the rim of the tin. Watch for it, you will see the oil grab the rim and seal in all of its goodness, indicating your 2 oz. container is full.
Last but not least, we all make mistakes. Pipettes and hairdryers are your best friends right here. If you overpour and the salves pills out of the tin, just leave it and move onto the next container. If you overpour and can suck off the excess liquid, carefully set down your pouring container and grab a pipette to suck off the excess before it hardens (you may also spoon off the excess). If you accidentally nick or dent a salve that is not quite hardened yet, whip out your hair dryer, set it to hot or warm with a low blow, and gently melt the top of your salve...removing all imperfections like they never even happened!
Infusing Oils

I often recommend using infused oils over essential oils for making salves. Why you ask? Essential oils are also called the volatile oils from a plant because they can be harmful if used incorrectly and because they can be unstable when exposed to extreme heat. Working in production, we have also encountered many clients/customers that do not enjoy or are sensitive to overly fragrant products. If utilizing essential oils in your salve, I recommend adding them to your melted beeswax, after you have removed your pot from the heat.
I encourage you to experiment with different base oils for your infusions. Coconut oil will have different properties than Grapeseed oil and Avocado oil is definitely different from Pomegranate Oil. As a general rule, Olive Oil is a pretty safe choice if you are unfamiliar with the different oils for extraction; it is widely available, fairly inexpensive, and most people aren't allergic to it.
Make an infused oil like you would a tincture, keep it in a warm (room temperature) environment and out of sunlight. Allow the herbs to infuse (macerate) for a minimum of 2-4 weeks. Add a splash of high-proof alcohol to your oil, this will produce a much stronger extraction (compare it to an infused oil without alcohol, you will see the difference in color). And like tincturing herbs, you have the choice of infusing your oils with only one herb or you can infuse all of your herbs into one infused oil formula, just be sure to have your herb ratios correct.
Always keep your oil equipment separate from your tincture equipment, this helps to prevent everybody from ingesting any oils that did not fully wash off the utensils.
Making your own herbal products can be so rewarding; you harvest the plants, you make the tincture (or infused oil in this case), and you get to see the plants in action! From seed to harvest, you know everything that goes into the process of making your own herbs at home. You have put your love, energy, and intentions into the herbs that you give to your friends and family. I know it seems daunting at times and we often become worried about the scientific approach by needing to measure everything, but honestly, the best products are what we make from the heart. When you have questions, do not be afraid to ask us, that is what we are here for!!*
*Please consult with your healthcare practitioner before taking any liquid supplements. Do not take if pregnant or nursing.
**These statements have not been evaluated by the FDA. This product is not intended to diagnose, treat, cure or prevent any disease.
I have salve that gets a skim on the top . How do I prevent this.
Miracle Salve
My salve comes out good but it only works for a short time how can i make it work longer?
I accidentally got water in my melted salve! Help!
Thanks for sharing, I learned about oil tinctures here(I’d thought about it instead of one that’s water based). Thanks for all the details especially about sampling batches..ecetera
Helpful instructions and pictures, thank you for sharing.
Leave a comment